User manual: Console
 Status:
This information applies to Console version 1.50.1017.296 (28. january 2026)
 Contents:
- Overview
- The Console Windows
- General Control
- The Control Bar
- The Selection Toolbars
- Display Category
- Display Category Toolbar
- Console Permissions
- The List View
- User defined list views
- The Graphic View
- The Message View
- History list dialog
- Console Cache
- Command line options
- Console Configuration Files
- Defining the Console Database tables - page icons, group icons
- Defining graphic/bitmap pages
Other links:
- Consys home page
- ConSys User Manuals
- Console List Views - creation details
- Console Database tables
- ConSys Interpretations
 Overview:
The console program is the main client program on operator stations. It is general-purpose program displaying acquisition values and performing on-line control of the hardware. The console is hardware independent - all settings and parameter pages, addressing etc. is stored in the control system database. The major parts of the console are the List View, the Graphic View and the Control bar. The list view generates standardized pages with parameter listings from the database informations. The graphic view takes a standard bitmap as background and show parameters on top of the bitmap. The Control bar is used for an 'analogue fell' panel for easy control of parameters.
F4: Clear List View
F5: Clear cache
F6: Normal view:
Set the console splitter windows to the normal size. Enables the control bar,
the page bar and the group bar. Disables the user select bar.
F7: Graphic view maximised:
Set the console splitter windows with the graphic view is maximised.
Disables the control bar, the page bar, the group bar and
the user select bar.
F8: Message view maximised:
Set the console splitter windows with the message view with maximised.
F11: Full Screen view/Normal view:
Toggle between full screen view without caption
and normal view. In full
screen mode the console the caption and menu bar is hidden and the console is maximised. Pressing F11 in full screen mode will bring the console back to normal
display.
shift+F6: Normal view, Full screen
shift+F7: Graphic view, Full screen
shift+F8: Message view, Full screen
The Control bar is used to control analogue values on the control system. It is optimized for use with the digipot - but the mouse can also manipulate all controls. The Control has at least one tab view - each tab view being able to control up to 8 parameters. The control tabs can be given meaningful header names. When a tab is selected it is connected to the control system. The configuration of the tab is included in the console setup files stored/loaded with the file menu.

The Control Bar tab view:
The two identical sides of the control bar relate to respective the left and right digipot controls.
Upper slider: Reading for selected parameter. The reading value for the selected parameter is also displayed as a number above the control values.
Lower slider: Control slider for selected parameter. If the control is disabled, either from the digipot or from the resolution buttons, the slider is marked as inactive (grayed) and can not be moved. This is also the case, if the connection to control system is not working properly.
Selection List: Show current parameters in the control bar. The selected parameter is the parameter currently being controlled.
Control values: Parameter control values are displayed next the names in the selection list. Show '***' if the parameter is not connected to control system - or if no control channel exist for the parameter. If a control value is displayed and controls are enabled the value can be entered from the keyboard by clicking on the control value.
State lamps:
Absent: No control value.
![]() : No control
present or no connection to the control system.
: No control
present or no connection to the control system.
![]() :
Active control connected to the control system.
:
Active control connected to the control system.
![]() : Active
control connected to the control system. Current control value is stored and
equal to the displayed value.
: Active
control connected to the control system. Current control value is stored and
equal to the displayed value.
![]() :
Active control connected to control system. Stored value different from current
value exists.
:
Active control connected to control system. Stored value different from current
value exists.
Selecting parameters to the control bar
Parameters can be selected to the control bar by 'drag and drop' from the list view, the graphic or another ConSys application. Position the mouse on the parameter in the list view or graphic view. Press the left mouse button while dragging the parameter to the control bar. Release the mouse button when the mouse is over the selection in the control bar where the parameter should be positioned. The existing connection to the control system for the control bar is closed and reopened with the new parameter list by this operation.
Store/Restore of control values
Control values for the active tab can be stored and restored. To store: Press the store button on the digipot or use the right mouse key in a unused area on the control tab. To restore: Press the restore button on the control bar or the right mouse key on the control tab. Stored values are kept even when another tab has been selected between store and restore.
Managing control bar
Use the right mouse key on the tab header to create, delete or rename a tab. From version 1.24.96.161 insertion of new tabs are made next to the tab where the mouse is positioned. It is also possible to use cut/copy and paste.
Using the digipot with the control bar
The left side of the control bar is used with the left controls on the digipot - and right with right.
A short press on the digipot up and down buttons will change the parameter selection a step up or down.
A long press on the up and down buttons will change resolution up and down.
The button on the topside of the digipot toggles the control bar between enable/disable.
![]()
The list view pages are selected from selection toolbars. A two level selection scheme is used to select a console page: The first level selects the page group - the set of pages displayed in the next level. When a new group is selected a new page select toolbar is created from the database, and the first page in the page set is loaded in the list view. Groups and pages can be selected by the toolbar buttons or in the drop down list box. If the mouse is parked for s short while over a button the group/page name is displayed as a hint. All informations needed to build the toolbars are stored in the central database for the control system. The group informations can be reloaded from the database either by the 'Reload' function in the menu or by changing the display categories. See the database description for the console for more information on how the toolbars are defined.
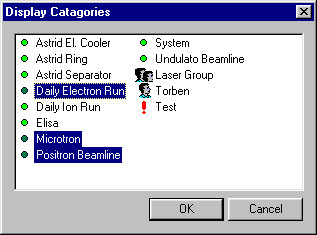
All display page groups and display pages belong to a category. The available categories can be set from the menu 'Edit|Display Category'. Only groups and pages that are selected in the display category dialog will be available in the selection toolbars. Selecting more than one category is done in the standard windows way: To select a range, first select the first category with the left mouse key, then press the shift key and the left mouse key on the last category in the range. Further categories can be added by pressing the left mouse key together with the ctrl key. Remark: If no categories are selected it has the same effect as selecting all categories. The available display categories is dependent on the current user permissions - only display categories to witch the user has access to are listed in the dialog.
![]() System
category. General control system pages/groups.
System
category. General control system pages/groups.
![]() Single user category. Used for personal console pages/groups.
Single user category. Used for personal console pages/groups.
![]() Group category. Used for special console pages for a group of people.
Group category. Used for special console pages for a group of people.
![]() Test
category. Used for test pages/groups.
Test
category. Used for test pages/groups.
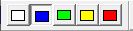
With the display category toolbar, 5 different sets of display category selections can set and switched between. The 5 buttons each can have a different set of 'display category' selections. The current content of each selection is stored with the console setup file. If no setup file is loaded, the console starts with a hardcoded default of console category selections. The selections for each button can be changed/set from the console menu by editing 'Display Categories' (Edit|Display Categories). When display groups are changed with this method the currently selected category toolbar content are changed as well.
The available display groups, console page groups and graphic pages for the current user are dependent on the user permissions. These permissions are all based on 'Display Group' permissions and can be set by ConSys managers using the DatabaseEditor
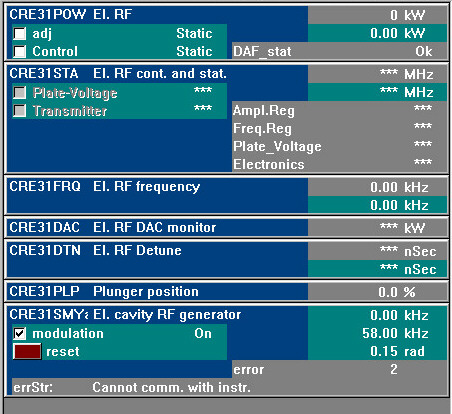
The console list view is general-purpose window to display and control standard parameter types on the control system. List view pages are created from informations stored in the system database. Each page is basically defined as a list of ConSys parameters.
Layout
The order in the list defines the display order on the view. Parameters
with the same name and different surnames are displayed in a raised frame with
the parameter name and a description in the top. In general, control values are
displayed on a green background in the left side, and status values on a gray
background in the right side of the frame. Floating point values without
displays of surname are displayed in the top right side of the frame. Important
parameters can be highlighted - dark yellow background for status values and
bright yellow for control values. A more detailed information on the creation
scheme is given in technical
notes on console view creation and in the database
setup informations.
Control
Some controls, like radio buttons, check boxes and other kind of buttons
are controlled directly by clicking on the control in the list view. Double
clicking on a floating-point control value or word control value will bring up
a control dialog to set the value. Floating-point values will typical bee controlled
by the control bar. If a floating point read value is
double clicked, the corresponding control value will be opened for control
(defined in the database as the control parameter with the same position if this
exist - else the first control parameter in the name group).
Drag/Drop
The list view acts as a source for drag/drop of ConSys parameters. ConSys
drag/drop objects can be either full-specified parameters (parameter name,
surname) or group-specified parameters (parameter name only). The dragged
objects can be dropped in any program accepting ConSys drag/drop. A typical use
is drag/drop from the list view to the control bar. Pressing the left mouse key
on the object to be dragged starts a drag/drop operation. Keep the mouse button
down while the object is moved to the destination. Release the mouse button on
the destination location. The object source for the drag/drop operation will be
highlighted with a clear blue background during the operation. As long as the
mouse is position over invalid drop locations the cursor will be a forbidden
sign. When the mouse is over a valid drop location the mouse will change to a
pointer with the ConSys drag/drop sign 'CS 6.16'.
Initiating drag/drop from a control in a frame will give a full-specified ConSys drag/drop object.
Initiating drag/drop outside the controls in the blue part of a parameter frame will give a group-specified ConSys drag/drop object.
The control bar accepts full specified as well as group specified drag/drop objects. If a full-specified drag/drop object is a floating-point control value, the control bar accepts it as the selected control. Otherwise, the control bar looks in the database for the first floating-point control for the parameter group. The first floating-point reading for the parameter group is showed as the reading value in the control bar.
Remark: Be careful when a bit control or other control with activation directly in the list view is being used as source in drag drop. Do not release the mouse button before the mouse is outside the control to avoid the control from changing state by the operation.
Connection status
The list status of the connection to the control system is reflected for
all parameters in the list view. Invalid values/controls will be grayed and
their values filled with '***'. All input are disabled for parameters with
invalid/broken connections.
Headers and Web links:
These are special non-parameter items in the list view. They are defined
instead of parameters in the console page. The header will be displayed as a
text line. A web link will appear and works as a standard web link in browsers.
See the database
set up information for further details.
Pop up windows:
A popup window with all parameters belonging to a name group can be brought
up by double clicking at any place in a list window that does not contain a
control value. (Remark: Double clicking a non control value in the graphic view
will also bring up a popup window.) The popup window be set to a topmost
window in the menu that appears by right clicking in the caption bar.
Set value dialogs: Double clicking on a value will bring up a dialog box where the value can be controlled directly. For floating point set value dialogs this can be done by a number of spin wheels - one for each digit - and a custom spin wheel. First time a floating point control dialog for a given item is shown, the custom value is set to LSB. As long as the page is in memory, the last used spin value is remembered. (If console cash is enabled, spin values are also remembered after console page changes). If 0 is written in the increment box, the spin value will be reset to LSB.
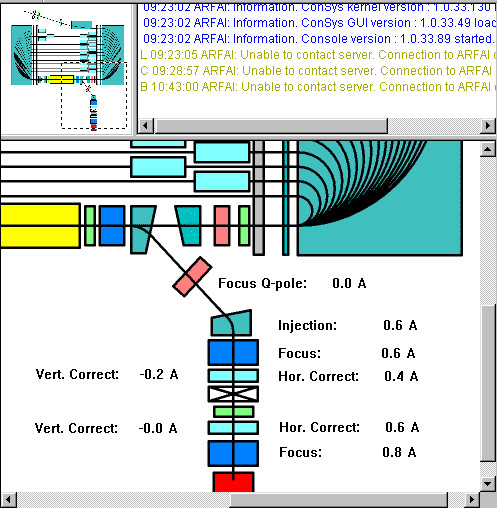
The graphic view is essential a bitmap background with a list of ConSys parameters on top of the bitmap. All informations needed to generate a graphic view are stored in the ConSys database. The information includes the name and location of the bitmap and a list of parameters with position on the bitmap and other display options. Editing of the database settings for the graphic view is done within the console program itself. The graphic control pages are selected from graphic control toolbar. If the Auto sync. Graphics button is pressed the graphic page will change with the list view pages when these are changed. The drop down list box in the toolbar can also select graphic pages.
Parameters placed on the graphic view have the same functionality as parameters in the list view - including drag/drop and control capabilities.
The mouse scroll wheel can be used to scroll the graph view: Click on the graphic view to enable mouse wheel scrolling. Use the mouse wheel to scroll horizontally. Click on the mouse wheel to change to vertical sc
The graphic view consists of two windows in the console: The small tracker window can be used to scroll the full size parameter view.
From version 1.26.137.224:
Graph page - changing the database background graphich location:
The location background bitmaps for the can now be changed from the default location stored in the database. Open options|Graphic file location. If 'Custom common path' is selected, the graphic backgrounds is loaded from the specified directory instead of the directory specified for the given graphic page in the database. The console will substitute the path specified in the database with the custom path. The custom path will typically be a path on the local computer. The user must ensure to keep an updated copy of all console bitmaps in the specified folder. Typical use of this feauture could be on slow network connections - or when accessing ConSys from remote locations where the DFS names used at ASTRID could not be used. The changed location is stored in registry under current users -software/ConSys/Console
The message view display all status messages generated internally in the console program or received from the control system. The message color indicates the type of message:
Blue: Informal
Yellow: Warning
Red: Error
All messages has the following format:
<Time><Source><Computer generating the message><Message description><Message>
<Time>: The time the message was received
<Source>: The part of the console program that received the message. None: Internal console message, L: Message received from list view connection, B: Message received from graphic/Bitmap view connection, C: Message received from control bar connection.
The history list dialog shown in Console by right clicking on a parameter and selecting one of the three history commands 'History - detailed', 'History - ConSys as in CsPlot' or 'History - CsLog2020' all opens the same history dialog but with different startup selection for the history type to list. Depending on the parameter type and optional log options the history list dialog can have different options and appearances. For values with CsLog2020 history data the list view includes options to retrieve the SQL log history data. The options availeble and the way the filtering on select filters works depends on the log method used for the given parameter.
Parameters without CsLog2020 logged data:
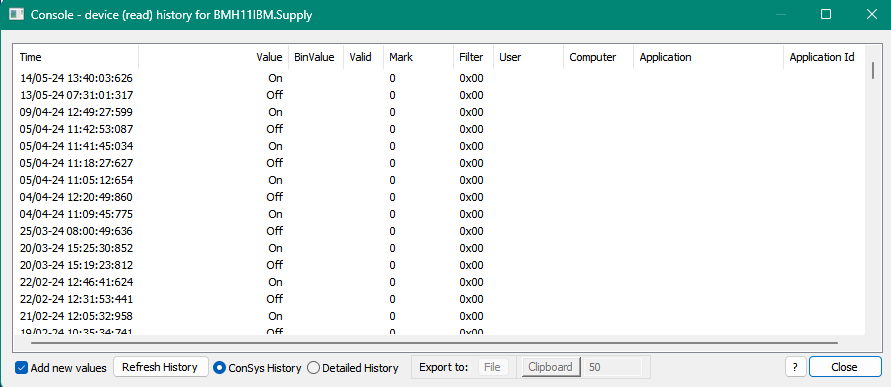
The Console history list dialog list the different types of online histories
ConSys Read History: The read history stored in ConSys devices memory.
ConSys Write/Detailed History: The write history stored in ConSys devices memory. The write history includes detailed informaton on the write source.
Mark: Low byte of ConSys data values mark and filter word for ConSys live data, ConSys read histories and ConSys write/detailed histories. For CsLog2020 data, list the CsLog2020 log mark flag.
ConSys data mark values
| Value | Mark meaning | Typical use |
| 0 | No mark | |
| 1 | Mark start | Start of major change/step in data. Typical set on last value just before step. |
| 2 | Mark | During major change/direct on major change value |
| 3 | Mark End | End of major change/step. Typical set on value just after major change. |
| 'Mark start', 'Mark', and 'Mark End' used in read histories to avoid averaging in step values to keep the step in the averaged part of the history data | ||
| 10 | Invalid data | |
| 11 | Data undefined |
Filter: High byte of ConSys data values mark and filter word for ConSys live data, ConSys read histories and ConSys write/detailed histories. This byte is used as indidual bit filter marks.
| Filter bit name | Bit number | High Byte | Description |
| Reduced | 0 | 0x01 | First level mean of data |
| Reduced Multiple | 1 | 0x02 | Multiple level mean of data |
| Local Device | 4 | 0x10 | Data is from local copy of device that is defined to run on another computer (loaded with /ld) |
User, Computer, Application Source information set by device (read values and writes from other devices) or application (write values).
Application Id: The ConSys data values has an DWORD application-id that can be set from an application to identify itself when values are returned from a device.
Application id format (all hexadecimal values):
'xx.xxx.xxxx', 'Application Specific Id'.'Application Type Id'.'Unique Serial Id'
For application ids and more details, see List application and instance specific id.
Standard CsLog2020 logged parameters:
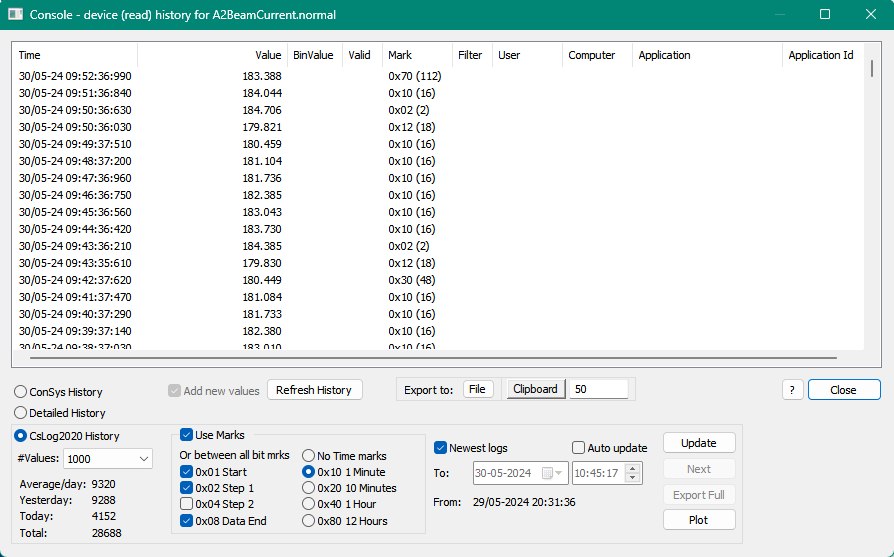
For parameters with CsLog2020 data logged with standard logging (i.e. not min, max and average) the mark byte bits are all used as individual bit filters. The bit marks can either be ignored showing all logs ('Use marks' disabled) or include values with at least one of the selected bits in the mark ('Use marks' enabled). The mark bits are:
bit 0, 0x01: Start, set at every start of a log series (device/DataLogger start)
bit 1, 0x02: Event mark 1, set by device/application, default absolute change greather than 10%
bit 2, 0x04: Event mark 2, set by device/application
bit 3, 0x08: End
bit 4, 0x10: 1 minute mark, Set by core log code when at least one minute since last 1 minute mark.
bit 5, 0x20: 10 minute mark, Set by core log code when at least 10 minutes since last 10 minute mark.
bit 6, 0x40: 1 hour mark, Set by core log code when at least 1 hour since last 1 hour mark.
bit 7, 0x80: 12 hour mark, Set by core log code when at least 12 hours since last 12 hour mark.
Average, Min and Max CsLog2020 logged parameters:
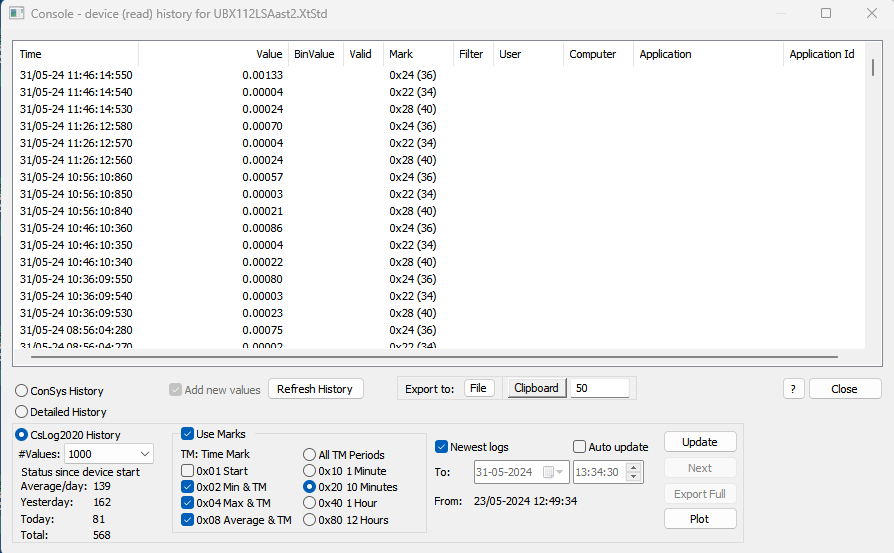
For parameters with CsLog2020 data logged with a combination of minimum, maximum, and average loggings some of the mark bits are used as individual bit marks, some as minimum, maximum, and average marks and some as log period slot mark. To show averaged/minimum and/or average values the respective mark(s) must be selected together with the log period to show - or 'All TM Periods'
bit 0, 0x01: Start, Set at every start of a log series (device/DataLogger start)
bit 1, 0x02: Minimum mark, Set by average logging on logged minimum values.
bit 2, 0x04: Maximum mark , Set by average logging on logged maximum values.
bit 3, 0x08: Average mark , Set by average logging on logged averaged values.
bit 4, 0x10: 1 minute mark, Set on values belonging to a 1 minute average period.
bit 5, 0x20: 10 minute mark, Set on values belonging to a 10 minute average period.
bit 6, 0x40: 1 hour mark, Set on values belonging to a 1 hour average period.
bit 7, 0x80: 12 hour mark, Set on values belonging to 12 hours average period.
In normal operation, all database informations are loaded from the database whenever they are needed. This may be time consuming on slow network connections - or if the SQL server is busy. In these situations the Console cache should be enabled. When cache is enabled the following informations obtained from the database is stored in memory:
Page bar setups
Console pages.
The console pages and page bar setups are stored in cache the first time they are visited with cache enabled. Disabling the cache also clear the cache memory.
Command line options are not case sensitive.
/edit or /e
Start the console in edit mode. This mode is used for editing of the graphic
console pages. The console is not connected to the control system in this mode.
/full
or /f
Start the console in full screen mode.
/graph or /g
Start with graphic view maximised
/p
or /pos (<x>.<y>,<width>,<height>)
Set initial position and size. Format /p [x] [y] [width] [height]
/i
or /deviceId <deviceId>
Load console with all parameters from device 'deviceId'.
/dc
or /disableCache
Start console with cache disabled.
/c
or /cluster <parameter list>
Load parameters specified by the parameter list. The parameterList can hold any number of parameters seperated by space. Each entry in the list can be:
* a clusterName
* a clusterName.surName
- Wildcards are allowed in clusterName and surname
'*' or '%': Rest of name can be anything.
'?' or '_': Any character
/toolPos <Toolbar position name> or /t <Toolbar
position name>
Start with the toolbar position and visible states stored under Toolbar
position name instead of the default name.
/noSound or /n
Do not play sound when new message arrives.
/readonly or /r
When the console is started with option no values are send. In debug mode,
values that would have been send is traced.
/dedicated or /d
If defined, the Console will use decidated connections instead of the
common connections to remote servers.
/valid or /v
This is a special option primary supposed to be used for debugging purposes. It allows to set and clear the valid flag on write and read-allow-write values. When this option is enabled, right clicking on a write parameter shows the valid flag as a checkmark and allow it to be changed by clicking on the checkmark. The valid flag will also be present in the set-value dialogs with this option is enabled.
Remark that most devices will not use the invalid flag on a write value and will return a valid value back when setting an invalid value. Can be used with storage device parameters and some calculation-based devices.
If changing the valid flag on an operational parameter is needed, it is better to set the allow-change-valid flag in database configuartion for this parameter.
<Console Setup File name>
If a console setup file name is specified the specified configuration is
loaded during startup of the console.
/lgp <page number>
Load graphic page at startup. Loads the graphic page specfied by <page number>.
Note that the page number does not relate to any numbers in the database, but to
the index in the graphic selection combo box in the console (0 enumurated)
New command line options from version 1.39.1601.264:
Command line options to select initial list view group and page. The group and pages can be selected either by 0 enumurated index in combo box/button number or by name. It is recommended to use names for group and page selections - indices may change dependend on changes in database (new pages etc.) and selection of display category.
/group <group index> or /gr <group index>
Select the list view group specified by the 'group index' in the group combo box.
/groupname <group name> or /gn <group name>
Select the console group 'group name'. Selects combo box with groupname and correspondent toolbar button.
/page <page index>, /pa <page index> or /pg <page index>
Select and load the page specified by the 0 enumurated 'page index' in the page combo box. A group must be selected by either name or index for this option to be active.
/pagename <page name> or /pn <page name>
Load the page 'page name'. If 'page name' can be found in the current group box selected by one of the group options, the page combo box and corresponding toolbar button are selected as well.
/search <search filter> or /s <search filter>
Start console with search for parameter in list view and graphic view. 'search filter' is the parameter search filter applied to the Console search tool -
i.e. should the cluster name or part of cluster name to search after.
/ldb <ODBC Name CsLog2020 database>
Set this option to specify a specific CsLog2020 ODBC database. Without this option Console will get logged data from the ODBC log database specified by the ConSys configuration database. With /ldp set, all log data will be from the specified database. Typical used for development to access log data in a test log database. If set, starting a CsPlot from Console will also be started with /ldb option with the ODBC name specified by the Console /ldb.
Examples:
Console /pos (1940,-725,615,720) /g /t GraphicOnly /lgp 9 "\\isa\data\astrid\console setups\Default.cns"
Console /i 1000
Console /c A2BeamCurrent.normal UBX???LSA*.X UBX???LSA*.Y
Console /gr 23 /pg 3
Console /gn "A2 Diagnostics" /pn "AtoA2 Viewers"
Most information used in the console is stored in the database. A few user/operational specific informations can stored in console configuration files. The console configuration files is binary files with the following informations:
- State of simple options: Auto Sync. Graphics.
- Display Categories
- Control Bar setup - including tabs, header names, selected parameters. The console setup files only store the names of the selected parameters - all additional information is looked up in the database to ensure correct addressing, conversion etc.
Remark: Positions of toolbars and their enabled/disabled state are stored in the registry and is common for all console instances on the computer. Note however that toolbar positions and view state, can be stored under a specific name with the 'View|Set Toolbar position name' menu point, and then set using the /t command line option.
![]() Defining the Console Database tables.
Defining the Console Database tables.
Console page configurations are stored in the ConSys database. All parameters in the ConSys system have a data type definition, a conversion definition and a display definition - stored in the database interpretation table. The console program uses these informations to generate the display for the specific parameters. Parameters in the console list view are grouped in parameter frames with identical parameter names. Detailed descriptions of the ConSys interpretations and construction of the console list view can be found the technical notes.
The console pages in the list view are defined in two tables in the database:
ConsoleGroup table: Define the groups of console pages shown in the group select toolbar.
ConsolePage table: Define the list view console pages.
Users can change these tables - either to add new pages or edit existing pages. All changes take effect immediately - so be careful - especial when editing existing pages. New/edited pages should be checked at once. Remember to disable the console cache while checking new pages. If the console groups are changed, the group select tab bar should be refreshed by 'Edit|Reload Group'.
![]() Defining the Graphic/Bitmap pages.
Defining the Graphic/Bitmap pages.
The data for the graphic view are stored in two tables in the ConSys database:
GraphicPage table: Has a list of graphic page names (shown in the drop down list in the graphic toolbar) and full qualified filenames for the background bitmaps. New graphic pages should be added in this table manually.
ConsoleGraphParameter table: Contain parameter list with positions and display options for all graphic pages. This table should never be edited directly. The console maintains this table itself. Run the console in edit mode to change the graphic pages.
Editing graphic console pages:
Start the console in edit mode by the command:
Console /edit
Select the graphic page to edit.
Add new elements by drag/drop from the list view or other ConSys applications supporting drag/drop.
When a parameter is dropped on the graphic view a dialog box with display options appear. The options given depend on the parameter type.
Options for a parameter present on the graphic view can be edited by double clicking on the view. Remark: Not all changes made in this way can be seen before the graphic view is stored and reloaded (to simplify the code).
A parameter can be deleted from the view with the pop menu obtained by the right mouse key on the parameter.
All parameters on a graphic page can be deleted by the 'delete all items' button in the edit toolbar.
Pressing shift+left mouse key while the mouse is moved can move parameters.
Pressing ctrl+left: Toggle selection of parameters for multiple parameter selection. First selected parameter is dark blue, following selections light blue. Use cursor keys to move all selected parameters. Use align buttons in toolbar to align to first selected parameter.
The database is updated by selecting the graphic view and pressing the 'Update Database' button in the edit toolbar.
Last Modified 29 January 2026