User manual: The ConSysManager (1)
 Status:
This documentation applies to version 1.40.1781.222 or above of the ConSysManager. TO BE UPDATED.
 Contents:
- Overview
- ConSys Management group
- Main ConSys Group View
- Making a computer a member
- Starting the ConSys Kernel as a service
- The local computer configuration
 Overview:
Together with the database the ConSysManager administrates the ConSys system. The ConSys Manager can manage one ore more ConSys groups. Each group is identified by a master configuration file. If the ConSys system on the local computer refers to this global configuration file, the computer is said to be a member of the ConSys Management group. It is important that computers working together, is members of the same group. This ensures consistency of communication protocol and security between the computers. On each computer in the management group there is located a local configuration file. This file contains information about the local configuration of the control system (The configuration of devices on the computer).
As the ConSysManager loads different parts of the system at runtime, many help pages is unique for the specific configuration, and the user is requested to obtain information about these modules in separate documentation.
Important:
It is only possible to administer computers on witch the user of the ConSysManager has administrator privilege - including full access to the ConSys section in the registry and write access to the ConSysExe share.).Command line options: (from ConSys version 1.26.135.537)
/b or /binary: Start up from old binary configuration file - used to convert to new ini file configuration - and maintain old configuration until all running versions of ConSys is newer than 1.26.135.537 (080417).
/c or /createConfig: Test for exitstence of ConSys configuration files for all instances specified in the database. For instances with missing configuration files create empty configuration file at ConSysmanager startup. (From version 1.40.1781.222)
ConSys Management groups:
When the ConSysManager opens it prompts the user for a group file. The group file is the master configuration file for a ConSys Management group. The user must supply a file, either by browsing the file, or by creating a new group file.
|
 |
If you choose to create a new group file, the ConSys Manager will prompt you for a number of steps necessary to initially create a configuration file. The steps needed to create a configuration file includes: |
|
Main ConSys Group View
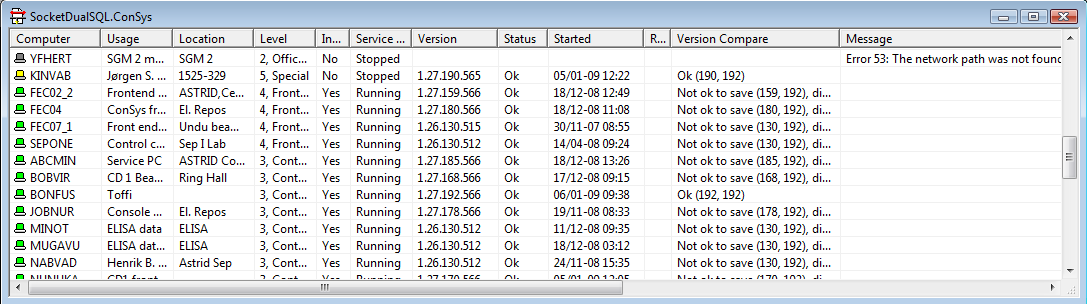
The view contains a list of computers registered in the database. Depending on the state of ConSys on the computer the icon may change:
Service running. This computer is a member of this management group and the ConSys kernel is running as a service. Double clicking on the icon a window for editing the local computer configuration appears.
Service not running. The ConSys Kernel is not running as a service on this computer. (Remark: The ConSysKernel may be running as an application, ConSysLoader). This computer is a member of this management group. By double clicking on the icon a window for editing the local computer configuration appears.
The computer was not accessible. It may be switch off, or there is a network problem.
The computer is not a member of this management group. The computer is accessible, and the environment variable ConSysRoot is present. The computer is not member of this management group, and can not be managed. It is possible to make the computer member of this management group by pressing
button. For further information se how to make a computer a member.
Illegal configuration. The computer was accessible, but the ConSys system was not installed properly. The environment variable ConSysRoot was not detected, or empty. If you don't have administrator rights on the computer, the manager can not access the relevant information, and reports it as this error.
The information has not been updated yet.
Update in progress.
The information waiting to be refreshed.
The columns in the list view:
| Column | Source | Description |
| Computer | State icon: calculated Computer name: Database |
ConSys state icon and computer name. For ConSysLoader instance 1 and 2, the _1 respective _2 is appended to the computername |
| Usage | Database | Usage string from database, set in 'computer' table, attribute 'usage' (DatabaseEditor, edit computer). |
| Location | Database | Location string from database, set in 'computer' table, attribute 'location' (DatabaseEditor, edit computer). |
| Level | Database | ConSys join level: The way ConSys is expected to be running on this
computer. Set in database computer table, JoinConSys DatabaseEditor,
edit computer). Levels: 0: not joining ConSys, 1: LapTop/Home, 2: Office etc., 3: Control system console/general purpos, 4: Frontend, 5: Special |
| Installed as Service | Windows Service Manager | ConSysLoader is installed to run as service (Yes/No) |
| Service Status | Windows Service Manager | Running/Stopped |
| Version | version of ConSysKernel.dll on ConSysExe share | |
| Status | ConSys connection (Direct request) |
ConSys kernel device status. Timeout: ConSys connection to remote system could not be established. Ok: The kernel reported everything ok. Not Ok: Connection to ConSys on remote computer is established, but the internal state is not ok. |
| Started | ConSys connection | The start date/time of the ConSysLoader service. |
| Readonly | ConSys connection | Read only state. |
| Version Compare | calculated | If Ok, the binary format of the configuration file on this computer and the remote computer is identical - it is safe to save a new local configuration file for the remote computer from this computer. |
| Message | calculated | Any message from the manager during state update. |
The view contains two entry's for the selected database(
![]() ) and transport (
) and transport (![]() )
layer. To edit the settings of the database and the transport lay, simply double click on the
toolbar buttons. The ConSys Manager will then open a view for editing the setup information regarding these modules.
)
layer. To edit the settings of the database and the transport lay, simply double click on the
toolbar buttons. The ConSys Manager will then open a view for editing the setup information regarding these modules.
To Save the global configuration simply press the ![]() button, or select 'Save' from the 'File' menu.
button, or select 'Save' from the 'File' menu.
Making a computer a member
Making a computer a member of this ConSys Management group requires two or three steps. It is a requirement that the computer is accessible and properly installed (the computer has the icon
![]() ). To make a computer member of this group press the
). To make a computer member of this group press the
![]() button.
button.
When a computer is made a member of this management group, the ConSys Manager tests if the computer has a local configuration file. If the file is not present you are promoted whether you one to create a new configuration file. The configuration file is then created. The computer is now marked for being a member of this management group, but it is not yet a member.
When the computers of interest is marked for being members, the actual transition is initiated by pressing the
![]() button. This saves the reference to the global configuration file to all computers marked as members of this management group.
button. This saves the reference to the global configuration file to all computers marked as members of this management group.
 Starting the ConSys Kernel as a service
The ConSys Manager can be used to control the kernel service. To install and start the service simply press the
![]() button. To stop and uninstall the service press the
button. To stop and uninstall the service press the
![]() button. The
button. The ![]() button stops the service, and reloads it, to upgrade software changes.
button stops the service, and reloads it, to upgrade software changes.
|
 |
To create a new device press the ![]() button. This will insert a new device after the current selection. To create a new device there is a number of steps to perform. The ConSys Manager will guide you through this in a template wizard. Because the devisees is loaded dynamically you have to select a dynamic link library (*.dll) and a device class. When these are selected, you are prompted to set up the initial initialization parameters of the device.
button. This will insert a new device after the current selection. To create a new device there is a number of steps to perform. The ConSys Manager will guide you through this in a template wizard. Because the devisees is loaded dynamically you have to select a dynamic link library (*.dll) and a device class. When these are selected, you are prompted to set up the initial initialization parameters of the device.
If you want to delete a device simply select the device and press the
![]() button. This will remove the device from the list.
button. This will remove the device from the list.
Each device has a part of the configuration file to store setup data unique to this device. To modify this setup after device creation simply double click on the device, and a device configuration window will pop up. Note: if the device don't need any configuration, a default configuration dialog appears.
When the configuration of the computer is set up, the file may be saved by pressing the
![]() button, or choose 'Save' from the 'File' menu.
button, or choose 'Save' from the 'File' menu.
Last Modified 03 October 2025